Marbled Candy Apples
A new spin on an old classic.
Who says candy apples need to be red? You can really use any colour (or flavour) that you like. All you need to do is prepare the hard candy mixture, pick your colours and then go to town!
Ingredients explained:
Sugar - plain old granulated sugar is not just for sweetness but provides the structure of this candy (and pretty much every other candy out there)
Corn syrup - helps to guard against crystallization of the sugar molecules
Water - helps to melt the sugar crystals
Flavouring - use candy flavouring, because it is highly concentrated, reducing the amount of moisture added and can handle high heat without burning off the flavour. I use LorAnn candy oils the most, because I find the flavours to be spot on. Cinnamon is the traditional flavour for candy apples, but any flavour you want to try would be fun. Caution on cinnamon - use a little, it is more potent than other candy oils, try 1/4 tsp to start.
Gel food colouring - I use gel food colouring for all candy making because it doesn’t add much liquid (which you don’t want) and the colours stay vibrant. Chef Master is my favourite brand to use because the colours are just so pretty and I find it doesn’t clump up as time goes by.
Tools required:
Wooden spoon
Glass liquid measuring cup (2 cup)
Bamboo skewers
Silicone mat or tin foil
The recipe
Marbled Candy Apples

Ingredients
2 cups sugar
3/4 cup light corn syrup
1/3 cup water
candy flavouring (cinnamon for a classic flavour, but use whatever flavour you want, go crazy!)
gel food colour, at least two colours
Directions
Prepare the apples - Apples need to be clean and dry for the candy to stick evenly. Take the stem off and if the apples have a wax coating on them, wash and scrub in warm water, helping to melt the wax. Once dry, put a thick bamboo skewer or popsicle stick in the middle.
Mix sugar, corn syrup and water in a small/ medium sized saucepan over low/med heat. Keep stirring until the sugar crystals dissolve. This will take around 4-5 minutes. If the mixture starts to boil before the sugar crystals dissolve, turn down the heat and keep stirring.
Once the sugar crystals dissolve, stop stirring, then turn the heat up to high/medium. Insert your candy thermometer and clip onto the side of the pot.
Once the mixture reaches 300F, take off heat and pour into a 2 cup liquid measuring cup. Add candy flavouring - if you are using LorAnn cinnamon, it is very potent, so use around 1/4 tsp. Stir with a bamboo skewer to combine.
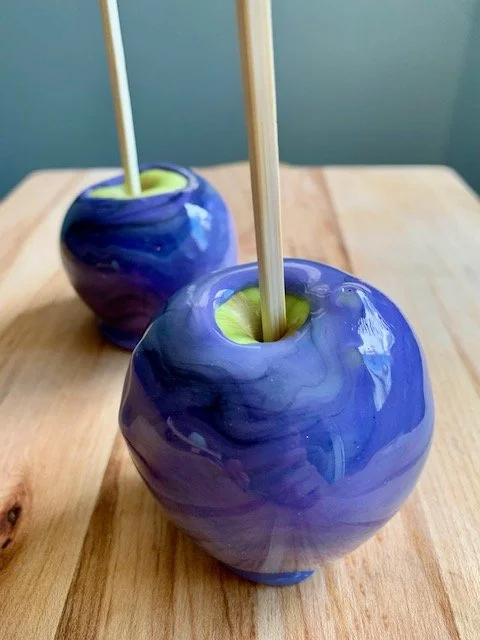
Marbling effect - Decide what colour you would like to use for the base, and for the marbling. In the example above, solid blue is the base and purple and black is the marbling. First, I mixed white and blue together to make a solid blue, then I took the tip of a clean bamboo skewer and dipped it into the other colours and then swirled it in to the sugar mixture. Don’t fully mix it in, just swirl it and the colour will most likely stay around the top. Use as much or as little marbling colour as you’d like. Tip: be gentle with the swirling as to not create air bubbles!
Dip the apple into the cup at an angle and swirl it around, covering the apple evenly. I find it easiest to hold the apple with your dominant hand so you can control the swirl, and then hold the measuring cup with your other hand on an angle, so the apple coats evenly and quickly. Place on a piece of tin foil or silicone mat to set.
You’ll notice that between each apple, you’ll have to re-marble your sugar mixture. Just keep swirling in your marbling colours between each apple and you’ll end up with some very unique and beautiful apples. (Sorry, these will not be uniform looking, but they’ll be oh so pretty). If you notice the sugar going too thick in between dipping (you do need to act fast), then pop it into the microwave for 20 seconds and it will thin out. Tip: microwave first, then add your additional marbling colour.
Makes 5-6 apples, store in the fridge for about 1 week.
You can do this!


Hey, I’m Kim!
After a lot of practice (and a few sticky disasters), I’ve crafted a delicious selection of lollies and mastered a ton of candy making tips to share with you—lump free. (You’re welcome.)