Microwave Caramel Sauce
It’s almost too good to be true.
Looking for a fast, easy caramel sauce that’s better than the store bought version? Here it is! I was pretty skeptical with making caramel in the microwave, since I pride myself on the painstakingly slow stovetop method, but this version is a real time saver and the end result is smooth and yummy. Is it as good as the stove top method? Not quite. But the time and stress that is saved making this version makes it a no-brainer to have in your back pocket for those last minute caramel needs.

The recipe itself is fairly straightforward and things come together in a matter of minutes. However, you are still working with finicky sugar, so there may be a few obstacles that you might come across, most likely in the timing of cooking the sugar. Because microwaves vary, I can’t give you an exact time that yours will be done. Use your intuition, trust me, you will know. I also have given some notes to troubleshoot.
Required Tools:
Liquid measuring cup (4 or 8 cup)
Wooden spoon or spatula
Whisk
The recipe
Microwave Caramel Sauce

Ingredients
3/4 cup sugar
2 tbsp corn syrup (light or dark – I prefer dark for more caramel flavour)
2 tbsp water
2 tbsp butter
1/3 cup heavy cream, warmed
1 teaspoon vanilla
1/2 - 1 tsp sea salt
Directions
1. Combine sugar, corn syrup and water in a liquid measuring cup or microwave safe bowl and mix thoroughly.
2. Microwave on high for 3.5 – 5 minutes until the sugar mixture is a golden amber colour. Every microwave is different, so start with 3.5 minutes, then put back into the microwave in 30 second increments to achieve the desired colour. Do not stir.
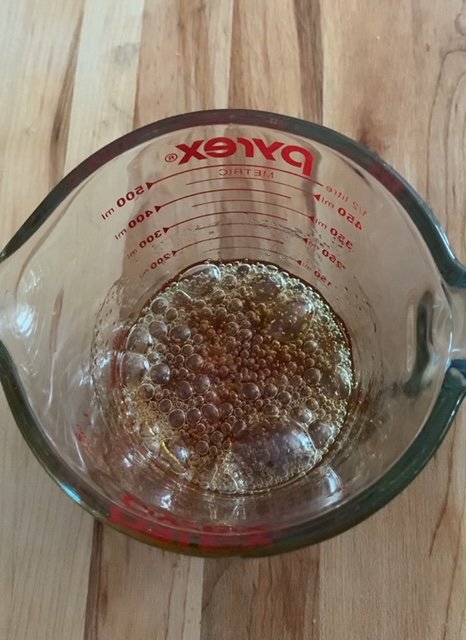
This is what my sugar looked like when I decided it was amber enough. This took four minutes in total in my microwave.
3. Once you’ve reached that golden amber colour, let the sugar mixture sit for a minute and it will caramelize further if desired. Then, add the butter and whisk to combine. Careful here, the caramel will steam and froth up, but just keep whisking and it will come together.
4. Heat the heavy cream in the microwave for 20 seconds, then gradually drizzle into the caramel. Whisk to incorporate, or switch to a spoon or spatula, whatever is easier. Careful here, it will steam and bubble.
5. Once mixed, stir in vanilla and salt to your liking. ½ a teaspoon of salt will enhance the caramel flavour, but if you prefer a salted caramel flavour, then add 1 teaspoon. Your call.
6. Caramel will thicken as it cools. Store in the fridge for up to 2 weeks. Heat for desired consistency. Makes approximately 1 cup of caramel sauce.
You can do this!
Notes
Tools
A liquid measuring cup is preferred because the handle and spout are very helpful for serving, as well, the glass makes it easier to see when the sugar has caramelized. However, if you don’t have one, a bowl works fine too.
Microwaving sugar
Because things are happening quickly during the sugar cooking stage and you are not using a thermometer, stay close and use your senses. It should look amber, not brown and should not smell bitter or burnt. In total, my sugar mixture took 4 minutes to cook, yours might take a little longer.
If you are unsure that your sugar has caramelized enough, let it sit a little longer before you add butter and cream. It will keep cooking as it sits so give it some time and it will most likely turn colour itself. If after three minutes it hasn’t changed colour and you don’t think it’s dark enough, put it back in the microwave for 20 second increments.
Resist the urge to stir the sugar while you are getting the desired colour, as stirring will just agitate the sugar at this stage and it may crystallize.
If the sugar mixture has overcooked and you start smelling bitter, burnt sugar, I’m sorry but you need to throw it out and try it again. Sugar can turn from beautiful golden brown to burnt in no time, especially in the microwave. The good news is, you haven’t added expensive dairy in yet, so…..there’s that.
Adding butter and cream
Once you add the butter and cream, the mixture can sometimes have a hard time coming together. If after a few minutes of mixing it is still lumpy, grainy or the butter is still separated, then put it back in the microwave for 30 seconds then stir again.
There may be chunks or grains that you can feel on the bottom of the measuring cup but otherwise the rest of the caramel is smooth and dreamy. That’s ok, there may just be some sugar that stuck to the bottom and isn’t fully mixing in. When you go to transfer the caramel into a storage container, resist the urge to scrape the bottom and just leave those bumpy bits. I know it’s going to be difficult to not get every last drop, but just leave it, it’s not worth it having chunky caramel.


Hey, I’m Kim!
After a lot of practice (and a few sticky disasters), I’ve crafted a delicious selection of lollies and mastered a ton of candy making tips to share with you—lump free. (You’re welcome.)